Picture Quilt Techniques for Uniquely Stunning Outcomes
Take Your Quilting to the Next Level With Five Picture Techniques

Imagine transferring a picture to a piece of fabric without using any paints whatsoever. You can turn a family portrait, outdoor landscape, nature scene or a still life photo into a quilt that lasts a lifetime. These quilts are not only stunning, but they are great pieces to turn into actual works of art that wow everyone who sees them. Try these five techniques the next time you feel inspired to turn a photograph into cloth. Keep in mind these portrait quilts are not full-sized quilts — they come in sizes close to traditional paintings, around the size of a piece of paper or portrait photo.
Tracing
Perhaps the easiest way to start transferring an image onto cloth is through tracing. This takes a somewhat artistic eye to get the shadow and perspective right. Trace the outlines of the shadows and light portions of the photo onto the fabric with pencil lines. You can make the pencil lines as light or dark as you need to since they blend into the quilt or become covered by the pieces on top.
After you trace the shadows and light, cut fabric to fill in the various areas. Darker shades of the similar hues go in the shadows, while lighter shades form the light areas. If you decide to use brown tones for the base, a chocolate brown could serve as the darker hues, while a beige might go well in lighter portions. Use pins to keep fabric in place while you place cloth on top of the base quilt with fusible material in between layers.
Computer Software
Computer software such as Picasa lets you zoom in on a portion of a photograph and turn it into grayscale. Copy a photo into the software, zoom in on the portion you want to make and then use the Fill Light, Highlights or Shadows commands to increase the contrast between light and dark areas. Select Posterize to create distinct areas between shadows and light. Make a black and white printout, trace the photo onto fabric, and proceed to cut out fabric pieces and attach them to the base quilt.
Thread Painting
The thread painting style uses applique to put thread and pieces of fabric directly onto the quilt. This technique may take more time, but the details are exquisite. Different shades of thread, sewn in various rows, combined with small pieces of fabric create a contrasted image. Seams create borders between light and dark without any tracing on the original quilt.
Confetti Naturescape
A confetti naturescape uses small pieces of fabric as color bases for various parts of the quilt. Attach a backing piece of fabric that you want for your main background color. Cut tiny pieces of earth tone cloth for the ground cover. Tree trunks can be brown and gray, while leaves are green for landscapes depicting warmer months, but then red, orange, brown and yellow for autumn. Contrasting highlights come in purple and yellow.
The key is to make toothpick-sized pieces of fabric to fill in specific areas, much like a paint-by-number piece. Once you have the colors in place, cover with black tulle and pin-baste the entire piece to keep the small pieces from moving. Stitch everywhere using gray monofilament thread using loops and curved stitching.
Landscape Quilts
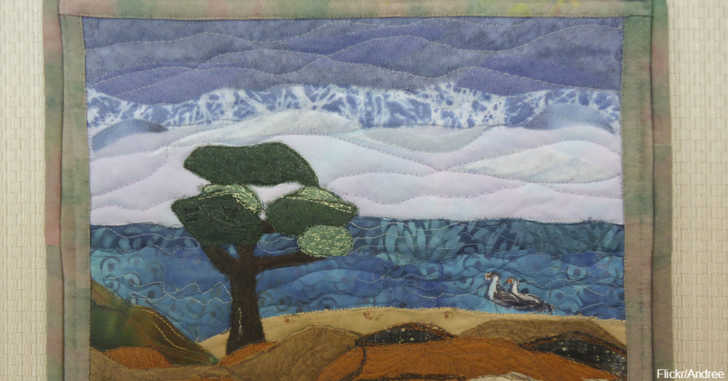
A landscape quilt starts with your favorite backing fabric, which can be whatever colors you want; go for green if you love summer leaves or blue for a beach scene. These quilts are interpretations of photos as opposed to tracing the actual pictures themselves. Cut strips of fabric for foreground trees, rounded pieces for rocks and flat pieces for sand. Add contrast with markers based on your light source.
The key to landscape quilts comes from adding textured layers of colored fabric for elements that are closer to or father from your eye. Larger objects appear closer, while smaller objects are farther away. As an example, a squirrel in the foreground is huge on a tree with lots of detail, whereas a squirrel far away is smaller and without much detail. The beauty of turning photos into quilts lies in the fact that you don’t need a lot of fabric. The base quilt is anywhere from 3 inches by 3 inches up to 11 inches by 17 inches. Scraps serve as the foreground colors, and you can use different colors of thread to augment your light and shaded areas. Once you have enough practice, wow your friends and family with realistic or stylistic depictions of real-life photographs. Take a look at this beautiful example of a still life picture quilt.
SKM: below-content placeholderWhizzco for CRH

