Adorable DIY Menu Board
Failing to plan is planning to fail, or so the old adage goes. And when it comes to dinner time, I don’t like to fail.

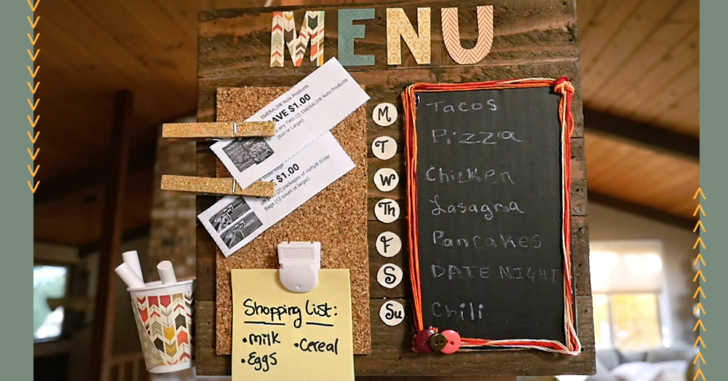
Failing to plan is planning to fail, or so the old adage goes. And when it comes to dinner time, I don’t like to fail. After a long day at the office, sitting in meetings, and then sitting in traffic, walking in your front door feels like crossing a finish line! If your evenings are anything like mine, however, you know that the race has really just begun. Between laundry, errands, and other commitments, dinner can get lost in the shuffle. Enter: The Menu Board. This has already saved my husband and I a ton of money just by being able to meal plan and shop accordingly. No take out or delivery here, we know exactly what’s for dinner this week! Go ahead and see what we’ve done in the video below and get inspired to make your own menu board that fits your family and your life. Happy meal planning, friends!
If you’re feeling really ambitious about organizing and meal planning, check out this article on how to clean and organize your fridge!
Supplies:
– Finished wood pallet, or other recycled & finished wood
– Cork board pieces
– Cardboard
– Vinyl chalkboard
– Scrapbook paper
– Clothespins
– Thumb tacks
– Hot glue
– Plastic cup
– X acto knife / scissors
Directions:
1. Plan out how you want everything to look, and mark with painter’s tape.
2. Cut the cork board down to size (for our 10 x 10 pallet board, we cut the cork board to 8 x 4 inches). Cut the same size (8 x 4) out of cardboard and vinyl. Attach chalkboard vinyl to cardboard. Attach cork board and chalkboard to the pallet with hot glue, leaving a ½ inch margin around the sides and bottom edge.
3. Trace out 7 circles on scrapbook paper, and cut out. Label each circle with the abbreviations for the days of the week and glue these circles to the wood pallet, in between the cork board and chalkboard.
4. To make clothespin coupon holders: glue pushpins to clothespins. Hang up shopping list, photos, other embellishments.
5. For pen holder: Cover a paper cup with scrapbook paper. Glue several pins to the back of the cup, attach to the cork board. (Or if you run out of room like we did, glue to the side of the board!)
6. Measure and cut out letters from scrapbook paper to say “Weekly Menu” and attach to the pallet with glue.
SKM: below-content placeholderWhizzco for CRH