These DIY Chic Wine Bottles Are My New Favorite Decoration!
Finally, and excuse to drink more wine! I want to spell, ‘Supercalifragilisticexpialidocious.’

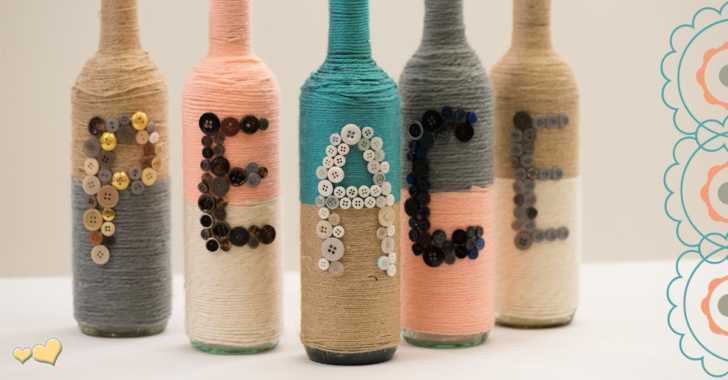
Finally, an excuse to drink more wine! I’ve seen this idea floating around the Internet for a while now, and I can honestly say it’s adorable and super easy. The trickiest part is transitioning the string from the neck of the bottle to the body, but after doing five of these bottles, I can give you a helpful hint: Turn the bottle upside down, and gently glue and wrap the string around, letting gravity hold everything in place till you glue it down. These were seriously so fun, and turned out great!
** Warning: We do NOT recommend consuming five bottles of wine and then trying to operate a hot glue gun. Trust us.
Supplies:
– Wine Bottles (1 for every letter of the word you want to spell)
– Any combination of twine, string, yarn, or wool
– Lots of buttons and / other embellishments
– Hot glue gun & glue
Directions:
Tie a knot at the top of the bottle, leaving at least a 2 inch tail.
Wrap the tail around the neck of the bottle, gluing it in place.
Continue to wrap the long end of the twine or string around the bottle, placing a dot of hot glue every third or fourth row.
*Tip: When covering the slope of the bottle from the neck to the rest of the body, turn bottle upside down, and carefully wind string, glueing every other row to secure to bottle.*
Once you hit the main body of the bottle, keep wrapping. You only need to glue every tenth row or so to keep in place.
Secure the last row of string to the bottle with dots of hot glue every inch.
Arrange buttons and/or embellishments on the bottle, and glue down.
Repeat on other bottles, place on shelf, and start drinking more wine for your next project. Cheers!
SKM: below-content placeholderWhizzco for CRH