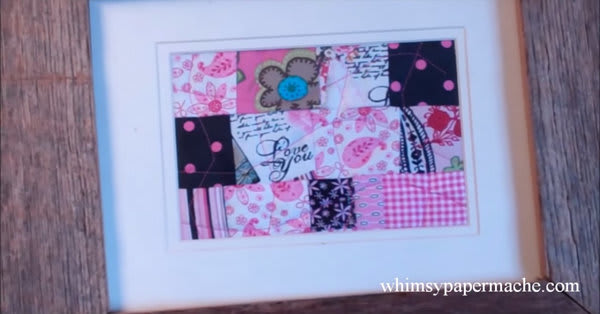
The Cutest Scrap Quilt Project: Framed Memento Quilt
We hate wasting our scrap fabric, so we decided to put it to good use! Check out our framed quilt “memento” and try it out yourself!

You all know how much scrap fabric one can acquire over time; we always feel badly when we see that much fabric just sitting there with no purpose (or worse, when we end up throwing it out instead of using it), so we try to come up with new and unique ways to repurpose said scraps. Here, we decided to use our scraps to create a little work of arta memento, if you will. We took our favorite fabric scraps, trimmed them all to squares of the same size, stitched them together, and then did some decorative stitching to top it all off. We found a cute, matted frame and decided to display it by our workspace. Now we constantly get to admire the fabric we love so much and we’re inspired to keep looking for new ways to recycle our scraps! Try it out and send in photos of your framed memento quilts!
Materials
(For 1, 5×7-inch photo frame)
- Scrap fabric, cut into 2 1/2-inch squares (12 total)
- Batting (6×8 inches for seam allowance)
- Backing fabric (6×8 inches for seam allowance
- Thread (in matching or complementary color)
- Needle
- Sewing machine
- Pins
- Matting for a 5×7-inch photo
- Rectangular frame (for a 5×7-inch photo)
Directions
- Begin to create your square or rectangle mini scrap quilt by laying 2 squares of fabric on top of one another, patterns touching.
- Leaving a 1/4-1/8th-inch border on one edge, feed the squares through your sewing machine. If you open up the square (like a book), the patterns should now both be right side up.
- Continue on either side until you have a row of 4 squares to fit inside your matting.
- Repeat with remaining squares to create 3 rows that you can stack them on top of each other and form a large rectangle that will fit in your frame.
- Once you have sewn all the rows of squares, place one row on top of a second, patterns touching, leave a 1/-1/8th-inch border and sew the two rows together. When you open up the rows (like a book), patterns should be right side up.
- Continue sewing remaining row together.
Note: you can iron your squares/rows flat in between sewing together, or once you’ve completed all your sewing. This will help you achieve straighter lines.
- When you have completed your scrap quilt “memento,” take your backing fabric and batting and cut them to size (if you haven’t done so already).
Note: you don’t have to leave a big seam allowance, since edges will be covered by matting.
- Take your batting and place it on top of backing fabric, then place quilted rectangle on top of the batting.
- Pin the edges of the three fabrics together and run them through your sewing machine. Once you have sewn them together, run the quilt through your machine to create a unique stitching pattern on top of the quilt.
- Trim the ends of all threads and set up frame. Place matting down onto the glass front of frame, then center your scrap quilt, face down, on top of the matting.
- Place the back of frame on top of the quilt and secure in place.
- Turn right side up and your quilted memento should be evenly centered in the frame.
- Prop up or hang on the wall and enjoy!
Template adapted from Whimsy Paper Mache
SKM: below-content placeholderWhizzco for CRH